Today we’ll be going over the second half of our wing design – sculpting that plank into an efficient and beautiful surface of great majesty and grace… sort of. And what’s more, unlike the last two posts, this will actually be important! So unglaze those eyes and look sharp.
Last time we established that our wing will be 1.25m in span and 0.21m in chord, and use a Clark-Y aerofoil. We have a wing-shaped plank.

We’re going to make it so much more; more efficient, more stable, and… slightly more difficult to build. Worth it. This post will cover the aspects of wing shape that need to be taken into account when designing the optimal flying surface. Size isn’t everything, you know…
Sweep

There will be no sweeping of wings in this blog, whether this way, that way, forwards or backwards, and certainly not over the Irish sea. Sure, it looks cool, but we’re not building models for hipsters here. There would simply be no point, as our aircraft will not be flying even remotely fast enough to benefit from it. Sweep also makes the wing harder to design and build. No sweep!
Dihedral
Imagine a bird flapping its wings – preferably something tasty, such as chicken or pheasant. Now that you’re hungry, allow me to explain the concept of dihedral.

See the picture above. It’s like a bird’s wings just before starting the downstroke. There isn’t really any other efficient way of explaining with words. We point the wings up a bit, and we have dihedral. It is one of the easiest ways to make an aircraft stable.

But wait! Surely pointing the wings straight up would lose us lift, right? Absolutely right, voice in my head. You clever thing. Have a bird.

Pointing the wing straight up gives us 0% useful lift, and pointing it flat horizontally gives us 100% – we have all the lift. Using dihedral will lose us some lift, so we typically only dial in a few degrees to improve stability – more than 5 degrees is unusual in full-scale aircraft.
Of course we’re building a model and can go wild, but every degree of dihedral means either a bigger wing or a higher stall speed, neither of which are particularly desirable – a bigger wing will make handling in windy conditions trickier, and a higher stall speed makes landing and launching less safe.
Unfortunately dihedral does make the wing less easy to design and build, as well as making it slightly weaker. You’ll find out why when we try to design the thing.
Angle of Incidence (AKA “Cheating A Bit”)
Thought experiment: we want to produce a fixed amount of lift at a fixed speed. To reduce drag and increase maximum speed, we want the wing to be as small as possible. We’ve already fixed our aerofoil, so what can we do to eke more lift out of our wing?
Well, you know how wings produce more lift when you point them higher? What if we were to mount the wing to the aircraft… with the wing already pointing slightly upwards? We now have a wing that can produce the same amount of lift at the same speed, but is smaller – and as a result, it’s less draggy, stronger, and less expensive to build.
Boom. Mind blown. Absolute genius. This angle between the aircraft’s body and its wing is called the Angle of Incidence.
Only problem is that we’re stretching the wing’s performance. Let’s imagine our wing stalls at 12 degrees. We bolt our wing to the aircraft with a 3 degree angle of incidence. The aircraft is now happier on the straight-and-level, but now it stalls at 9 degrees (for the maths: 12-3 = 9).
Using an angle of incidence is very handy tool for increasing the fuel-efficiency of aircraft – if you’re trying to get somewhere fast and with the minimum of fuel, using a smaller wing with a slight angle of incidence will get you there faster and save you a fair bit of money in the long run. You don’t want to push it too far though – drag increases sharply with angle of attack, so you could well end up with an aircraft that stalls more easily and yet is less efficient than one with a wing mounted with 0 degrees angle of incidence. And that’s just embarrassing. Just imagine what your friends would think – everyone would point and laugh, and you’d look like a buffoon. Hmm… Good word, “buffoon”…
An angle of incidence of 3 degrees is very common for aircraft of this type.
However, it also creates an extra level of detail that we could really do without for a starter aircraft. Our aircraft could be at 0 degrees, but our wing would be at 3, and our tailplane… I forget what a typical angle of incidence for a tailplane might be. I am kind of torn…
Given that we’ve already fixed our wing size, we’ve got a simple trade-off:
- Mount wing with a positive angle of incidence and get reduced stall speed, but reduced maximum angle of attack (aircraft is also slightly harder to design and build)
- Mount wing with 0 angle of incidence and get higher stall speed, but increased maximum angle of attack (aircraft is easier to design and build)
In theory, the first option might make for slower, easier landings, but could make for trickier slow-speed manoeuvring – particularly when trying to turn. The second option would make the aircraft easier to control when flying at speed, but would make for faster landings. It would, however, make low-speed handling slightly safer.
I suppose we’ll cross that bridge when we come to it. As it is, we only need to set it once we start pinning the tail design down.
Tip Losses and Wing Tips
This is going to be a bore, but it’s very important. Remember how we established that a wing creates lift by lowering the pressure on its upper surface, causing the pressure on the lower surface to push it up?
Unfortunately, that pressure differential can be… lossy. See, fluids don’t really like differentials. They want to be uniform; the higher-pressure air on the bottom wants to fill the space left by the low-pressure air on top. There are two ways it can do this:
- The good way: rejoining the low-pressure air behind the wing as it passes on (see image below):

Airflow Past a Wing. Wikipedia (https://i1.wp.com/upload.wikimedia.org/wikipedia/commons/9/99/Karman_trefftz.gif)
- The bad way: rejoining the air on the upper surface by sneaking around the wing tips (see image below):

Tip Losses. So very frustrating. Q’s Corner (http://www.dwave.net/~bkling/rc/howto/wingtips.htm) Yep. Our hard-won pressure differential is literally slipping away from us. Our precious lift is being stolen from us. And what do we get in return for our lost lift? Drag, that’s what. Also, horrible vortices trailing behind the wing tips (this is the reason airliners have to keep their distances between each other during landing – the trailing vortices would toss them around like ragdolls otherwise). Thanks a bunch, physics.
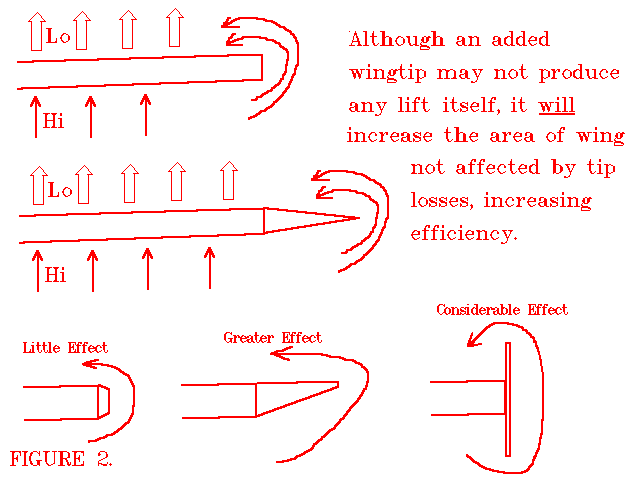
Tip losses, as they are called, are the reason why most airliners have some form of winglets on their wing tips – these quite literally block the air from the lower surface from the joining air on top. Some air still gets across, but the effects of tip losses are reduced.

Simply shaping our wing tips can have a similar (if diminished) effect without requiring us to build fragile winglets. We’ll probably go with some simple rounded tips, as these are simple and look pretty.
Note: I didn’t mention this when explaining wing theory because we had been looking at wings from a 2D perspective. Air falling off the sides complicates things – that extra dimension really can give the universe some very bad habits.
Aspect Ratio
If you read the section above, you’ll have seen from the pictures that a wing of greater span is a wing of lesser losses. As it happens, a wing of smaller chord is also less prone to tip losses. A crude explanation might be that since there is a shorter distance between the front of the wing and the back (aka leading and trailing edges), the air has less time under the wing to slip off to the sides.
Tip losses are thus directly linked to aspect ratio – a higher aspect ratio means a less lossy, more lifty wing.
To recap: aspect ratio is the ratio of wing span to wing chord. Looky below.

Unfortunately, we can’t build a wing of infinite aspect ratio – it would need to be of infinite span and infinitesimally (i.e. really, really small) thin. It would be impossible to build, impossibly fragile, and would experience collisions from anything from trees to celestial bodies. And just imagine trying to turn… no, don’t do that. It’s just too awful.
A high aspect ratio wing is also prone to flutter – have you ever watched the wings flex in an airliner? Too much of that flexing will rip the wings apart. Even if they stay in one piece, the constantly-shifting shape of the wing sends your lift vectors all over the place, and the aircraft becomes difficult to control. Building wings from exceptionally stiff materials such as carbon fibre is essential for flutter-resistant, high-aspect ratio wings.

A high aspect ratio wing is more fragile, prone to flutter, and more difficult to design and build.
However, low-aspect ratio wings have some advantages – their short, stubby flying surfaces provide high manoeuvrability, take up less hangar (or car) space, and are WAY stronger than their more efficient brethren.
Either way, we opted for an aspect ratio of six, simply because it’s typical for models of this type. It strikes a balance between reasonable efficiency and reasonable strength and manoeuvrability.
So why did I write this section, dear reader, if we have already set the aspect ratio? Because we need to figure out just how lossy our wing actually is. Our tail design and stall speed depend on knowing how much lift we’ve lost.
So how can we count our losses and figure out just how much lift our wing is actually producing? With maths, of course!
I’ll try to keep this as simple as I possibly can. If you read the last post (and I won’t blame you if you haven’t), you may recognise our friend, the Clark-Y lift plot. If you haven’t, then this graph shows how our aerofoil’s lift changes with its angle of attack. Increase the angle of attack (point the nose up), and you get increased lift up to around 12.5 degrees; decrease the angle of attack (point the nose down) and you get a decrease in lift (though apparently not below -7 degrees, which is weird).

See how the lift tends to rise evenly with increased angle of attack between -5 to +7.5 degrees? We can be a little rough and approximate that to a straight line.

Okay, very rough. I’m sorry, but I really don’t want to get into Excel in this post and I no longer have a MATLAB licence. Plus I’m using MS Paint here.
Anyhoo, let’s call our pretty red line the Foil Lift Curve for now (it’s not really called that, but it’s easier to remember). We’ll get something more accurate for the next post, in which we’ll actually be designing the blessed wing.
Aspect ratios lower the gradient of the foil lift curve, resulting in smaller lift gains for increased angles of attack. They do have the handy bonus of increasing the stall angle, though. Anyway, to illustrate:

The infinite aspect ratio wing is the ideal. See how you get more lift for your increased angle of attack? We want that. Let’s call the 3D wing’s lift slope the Wing Lift Curve. Note how both lift curves intersect at the zero-lift angle of attack. At this angle, both the aerofoil and the wing generate 0 lift. If you scroll up, you’ll see the Clark-Y’s zero-lift angle is roughly -2.5 degrees.
Anyhoo, the formula for determining the Wing Lift Curve:
Wing Lift Curve = (Aspect Ratio x Foil Lift Curve) ÷ (Aspect Ratio + 2)
Our aspect ratio was 6, but since we rounded up the wing chord to 0.21m, it’s actually 5.952. Plugging this figure into the formula, we can simplify down to:
Wing Lift Curve = (5.952 x Foil Lift Curve) ÷ (5.952+2) = (5.952 x Foil Lift Curve) ÷ 7.952
And finally:
Wing Lift Curve = 0.7485 x Foil Lift Curve
So when we figure out the Foil Lift Curve in the next post, finding the Wing Lift Curve will be a cinch. And from there, we will have no problem calculating just how much lift our will will be producing. Whoop whoop.
Parting Words
Right, I think that about covers it. We’ll design the flappy bits (ailerons, flaps and spoilers) much later on in the design process – in truth, we could probably get away with not having them at all. But hey, we will cross that bridge when we come to it.
Next time: actually completing the wing design (minus flappy bits)!
K, I’m done. Bye.
